
 Most of us are overwhelmed with too much email, and keeping up with organizing and decluttering is a constant chore. Why not let Gmail do some of the organizing for you! Filters let you create rules for how Gmail handles incoming email. Gmail can automatically delete unwanted marketing emails, direct specific emails to a folder and skip the inbox, forward emails from a specific sender to someone else, ensure UMN (@umn.edu) emails never go to spam and more! Here’s all you need to know about creating filters and step-by-step instructions for creating some helpful Gmail filters.
How to create a filter in Gmail
There are a few different ways to create filters in Gmail:
Option one: Create a filter by clicking the Gmail show search options box. Enter at least one criterion (sender’s email address, subject, keywords) to filter emails and click Create filter.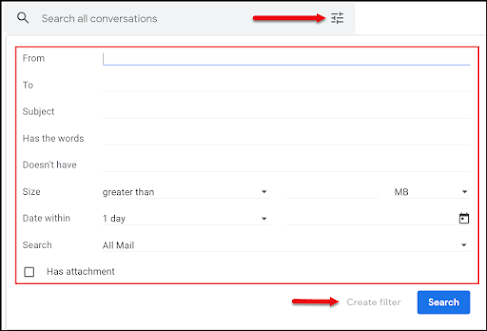
Choose what you want the filter to do

- Skip the inbox: Archive an email so that it doesn’t appear in your inbox.
- Mark as read: As the name suggests, have an incoming email already marked as ‘read.’
- Star it: Have Gmail mark the email as starred.
- Apply a label: Add a specific Gmail label to an email.
- Forward it to: Automatically forward an email to another email address.
- Delete it: Send an email to the trash.
- Never send it to Spam: Tell Gmail to never send a specific set of emails to Spam.
- Always mark it as important: Automatically mark a specific set of emails as important.
- Tell Gmail to never mark filtered emails as important.
- Categorize as: If you use multiple categories of inboxes such as Primary, Social, Updates, etc., tell Gmail to automatically add a specific set of emails under a category.
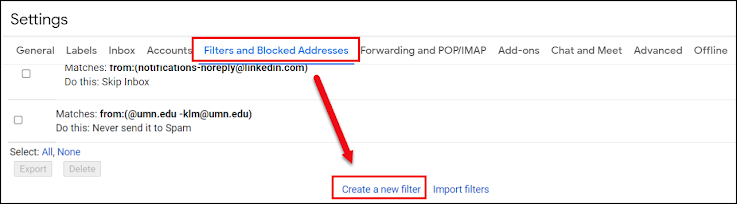
Option two: Create a filter in your Gmail Settings menu. Open your Gmail settings and select Filters and Blocked Addresses, click Create a new filter.
Option three: Select an email message that you want to create a filter for. Click the More button and select Filter messages like these.

Ideas for filtering email
Automatically add labels to emails and skip the inbox
This filter is great for newsletters and things you subscribe to that you do want to read at some point but you don’t want them to fill up your inbox.- Click on an email you want to create a filter for
- At the top, click the More button and choose Filter messages like these
- The From: field should show the email address you want to filter
- Click Create filter
- Check Apply the label: and choose an existing label or create a new label
- Tip: check the box “Also apply filter to xx matching conversations”. The filter will apply to existing emails in your inbox from the same sender.
- Check Skip the Inbox (Archive it)
- Click Create filter
Filter Calendar responses from the inbox
All of the calendar responses we receive when someone invites or accepts a calendar invitation can fill up our inbox. You may not want to delete them right away but you can file them away and delete them later.- Click the Show search options box at the top of your inbox
- In the To field, enter your email address
- Next to Has the words, enter invite.ics OR invite.vcs
- Check the Has attachment box
- Click Create filter
- Check Apply the label: and choose an existing label or create a new label
- Check Skip the inbox (Archive it)
- Check Mark as read
- Click Create filter
Add a label to important emails
One way not to miss an email from someone important is to add a label to it. Add color to the label to really make it stand out from your other emails.- Click the Show search options box at the top of your inbox
- In the From field, enter the person's email address
- In the To field, enter your email address
- Click Create filter
- Check Apply the label: and choose an existing label or create a new label (e.g. IMPORTANT)
- Check the box “Also apply filter to matching conversations”
- .Click Create filter
- Tip: Add color to the label. On the left side of your inbox, find the label (e.g. IMPORTANT) and click the three dots to the right of the label. Select label color
Auto-delete unwanted emails
I have a few email senders that I can’t unsubscribe from so I just auto-delete their emails. Here’s how:- Click on an email that you want to have auto-delete
- At the top, click the More button and choose Filter messages like these
- The From: field should show the email address you want to filter
- Click Create filter
- Select Delete it
- Click Create filter
Add a label to email notifications when someone shares a Drive file with you
This is handy if you can't find or remember a filename in your Drive that was shared with you.
- Click the Show search options box at the top of your inbox
- In the From: field, enter drive-shares-dm-noreply@google.com
- Click Create filter
- Check Apply the label: and choose an existing label or create a new label
- Click Create filter
Keep track of comments in your Google docs
If you want to refer back to comments made in Google docs, even after they’ve been resolved, create a filter to keep them in one place.- Click the Show search options box at the top of your inbox
- In the From: field, enter @docs.google.com
- In the Doesn’t have: field enter sheets OR slides
- Click Create filter
- Check Apply the label: and choose an existing label or create a new label
- Click Create filter
Prevent UMN messages from going to spam
- Click the Show search options box at the top of your inbox
- In the From: field, enter @umn.edu -myemail@umn.edu (e.g. -klm@umn.edu)
- Click Create filter
- Check Never send to spam
- Click Create filter
Automatically send 4-H Online automated emails to others
Situation: 4-H Online automatically sends notices to the “Primary 4-H Manager” in each county. A common request has been to have them sent to more than one person. It’s not possible to do that through 4-H Online but the Primary Manager can set up a Gmail filter to send a copy of those 4-H notices to their colleagues automatically and immediately.Below are instructions for the Primary Manager to have Gmail automatically send a copy of the emails to someone else:
Before you create a forwarding filter, you may need to set up and confirm a forwarding email address:
- Click the Gear/Settings menu
- Select Forwarding and POP/IMAP
- Click to Add a forwarding address. An email will be sent to the recipient to confirm they will allow forwarded email.
Create a filter:
- Click on an email that was sent to the ”Primary 4-H Manager” from 4-H Online
- At the top, click the More button and choose Filter messages like these
- The From: field should show the email address you want to filter
- Click Create filter
- Select Forward it and add a forwarding email address
- Click Create filter
Hey Karen. I'm in a new role but still learning from Extension :-) Thanks for this helpful post about Gmail filters. Every month I get HUNDREDS of auto replies for the company-wide meetings I host. Each time I hit send, I quietly say "RIP, inbox" and wait for the deluge to begin. This will make a big difference. Yay!
ReplyDelete